
카이도스의 Tech Blog
[CHAPTER 1&2] 기초 본문
CloudNet@-가시다(Gasida)님의 Terraform 스터디를 기준으로 작성됩니다.
Terraform 참고링크 :
- Code Github - 번역본 & 원서
- [Hashicorp] Learn - 링크 & Docs - 링크 & Language - 링크 & CLI - 링크 & Github - 링크
- [송주영] Terraform AWS 101 - 링크 & DevOps Workshop - 링크
- [버전 관리] tfenv - 링크
CHAPTER 1
데브옵스 :소프트웨어의 개발(Development)과 운영(Operations)의 합성어로서, 소프트웨어 개발자와 정보기술 전문가 간의 소통, 협업 및 통합을 통해 제품과 서비스를 빠른 시간에 개발 및 배포하는 것을 목적으로 한다.
1-1. 코드형 인프라(Iac) : 코드를 작성 및 실행하여 인프라를 생성, 배포, 수정, 정리하는 것 - 5가지 범주
- 애드혹 스크립트 : ad hoc script, 수행 각 단계를 코드로 정의하고 작성된 스크립트를 서버에서 수동으로 실행하는 것
- 구성 관리 도구 : Chef, Puppet, Ansible 등은 대상 서버에 소프트웨어를 설치하고 관리하도록 설계되어 있음
•애드혹 스크립트 대비 장점 : 코딩 규칙(coding convention), 멱등성(Idempotence, 항상 같은 결과값), 분산형 구조(Distribution, 다수 원격 서버 관리) - 서버 템플릿 도구 : docker, packer, vagrant 같이 하나의 코드로 서버 배포와 설정 가능
- 이미지 작업을 위한 도구 : 가상 머신, 컨테이너
- 서버 템플릿은 불변 인프라 immutable infrastructure 로 전환하는 데 있어 핵심적인 구성 요소입니다.
- 불변 인프라 개념은 함수형 프로그래밍에서 사용하는 불변 변수 immutable variable 개념에서 영감을 얻어 등장한 것입니다.
- 함수형 프로그래밍에서는 변수를 설정한 후에는 해당 변수를 다시 설정할 수 없습니다. 그러므로 값을 변경해야 하는 경우 새로운 변수를 만들어야 합니다. 변수 값이 바뀌지 않기 때문에 코드를 추론하기 휠씬 쉬워집니다.
- 볼편 인프라는 이러한 함수형 프로그램과 비슷합니다. 한번 배포된 서버는 다시 변경되지 않습니다. 그렇기 때문에 함수형 프로그래밍에서 새 버전의 코드를 배포하는 것과 같이 서버를 변경해야 하는 경우 서버 템플릿에서 새 이미지를 만들어 새 서버를 배포해야 합니다.
- 오케스트레이션 도구 : 관리를 위한 쿠버네티스를 통해 파드를 배포하는 것
- 프로비전 도구 : 2~4는 각 서버에서 실행되는 코드를 정의한다면, 테라폼/클라우드포메이션은 서버 자체를 생성함
1-2. 테라폼 : Terraform의 구성 언어는 선언적입니다. 즉, 인프라에 대해 원하는 최종 상태를 설명합니다.
작동 방식 : 하시코프사가 Go 언어로 개발한 오픈 소스 도구, OS 마다 바이너리 파일이 존재하는데, Go코드는 하나의 바이너리 파일로 컴파일되며 terraform 명령어로 실행
- terraform 바이너리가 AWS/GCP 등의 공급자를 대신해 API를 호출하여 리소스를 생성
- 테라폼은 인프라 정보가 담겨 있는 테라폼 구성 파일을 생성하여 API를 호출
동작

- Scope - 프로젝트의 인프라를 식별합니다.
- Author - 인프라에 대한 구성을 작성합니다.
- Initialize - (초기화/준비) 테라폼이 인프라를 관리하는데 필요한 플러그인을 설치합니다.
- 지정한 backend에 상태 저장을 위한 .tfstate 파일을 생성합니다. 여기에는 가장 마지막에 적용한 테라폼 내역이 저장됩니다.
- init 작업을 완료하면, local에는 .tfstate에 정의된 내용을 담은 .terraform 파일이 생성됩니다.
- 기존에 다른 개발자가 이미 .tfstate에 인프라를 정의해 놓은 것이 있다면, 다른 개발자는 init작업을 통해서 local에 sync를 맞출 수 있습니다.
- Plan - (예측) 사용자의 구성과 일치하도록 테라폼이 변경할 내용을 미리 파악합니다.
- 정의한 코드가 어떤 인프라를 만들게 되는지 미리 예측 결과를 보여줍니다. 단, plan을 한 내용에 에러가 없다고 하더라도, 실제 적용되었을 때는 에러가 발생할 수 있습니다.
- Plan 명령어는 어떠한 형상에도 변화를 주지 않습니다.
- Apply - (생성) 계획된 변경을 수행합니다.
- 실제로 인프라를 배포하기 위한 명령어입니다. apply를 완료하면, AWS 상에 실제로 해당 인프라가 생성되고 작업 결과가 backend의 .tfstate 파일에 저장됩니다.
- 해당 결과는 local의 .terraform 파일에도 저장됩니다.
기본 개념
- resource : 실제로 생성할 인프라 자원을 의미
- provider : Terraform으로 정의할 Infrastructure Provider를 의미
- output : 인프라를 프로비저닝 한 후에 생성된 자원을 output 부분으로 뽑을 수 있음. Output으로 추출한 부분은 이후에 remote state에서 활용 가능
- backend : terraform의 상태를 저장할 공간을 지정하는 부분. backend를 사용하면 현재 배포된 최신 상태를 외부에 저장하기 때문에 다른 사람과의 협업이 가능
- module : 공통적으로 활용할 수 있는 인프라 코드를 한 곳으로 모아서 정의하는 부분. Module을 사용하면 변수만 바꿔서 동일한 리소스를 손쉽게 생성할 수 있음
- remote state : remote state를 사용하면 VPC, IAM 등과 같이 여러 서비스가 공통으로 사용하는 것을 사용할 수 있음. tfstate파일이 저장되어 있는 backend 정보를 명시하면, terraform이 해당 backend에서 output 정보들을 가져옴
코드형 인프라 장점
- 자급식 배포 Self-service : 배포 프로세스를 자동화 할 수 있으며, 개발자는 필요할 때마다 자체적으로 배포를 진행 할 수 있음
- 속도와 안정성 Speed and safety : 자동, 일관되고 오류 적음
- 문서화 Documentation : 시스템 관리자 조직만 인프라에 관한 정보를 독점하는 것이 아니라 누구나 읽을 수 있는 소스 파일로 인프라 상태를 나타낼수 있음
- 버전 관리 Version control : 인프라의 변경 내용이 모두 기록된 코드형 인프라 소스 파일을 저장할 수 있으므로 버전을 쉽게 관리할 수 있음, 문제 발생 시 코드 원복
- 유효성 검증 Validation : 인프라 상태가 코드로 정의되어 있으면 코드가 변경될 때마다 검증을 수행하고 일련의 자동화된 테스트를 실행할 수 있음
- 재사용성 Reuse : 인프라를 재사용 가능한 모듈로 패키징할 수 있어 검증된 모듈로 일관되게 배포할 수 있음
- 행복 Happiness 😊
1-3. 사전 준비 : 특히 default VPC 를 사용하므로, 삭제한 경우 VPC마법사로 미리 생성해두세요.
1. AWS Free-Tier
2. AWS IAM User 생성 : 실습 편리를 위해 관리자 수준 권한(AdministratorAccess) 부여, 프로그래밍 방식 액세스 권한 부여(Access/Secret Key)
3. AWS CLI v2 설치 및 IAM User 자격 증명 설정 - 링크 환경변수
# macOS
$ brew install awscli

# windows
C:\> msiexec.exe /i https://awscli.amazonaws.com/AWSCLIV2.msi

# aws cli 버전 확인
aws --version
aws-cli/2.9.15 Python/3.11.1 Darwin/22.4.0 source/arm64 prompt/off

---
# aws configure 로 자격증명 설정 : 방안1
aws configure list
      Name                    Value             Type    Location
      ----                    -----             ----    --------
   profile                <not set>             None    None
access_key     ****************E3XG shared-credentials-file
secret_key     ****************bRW4 shared-credentials-file
    region           ap-northeast-2      config-file    ~/.aws/config

# 환경 변수로 자격증명 설정 : 방안2
Linux or macOS
export AWS_ACCESS_KEY_ID=AKIA.....
export AWS_SECRET_ACCESS_KEY=wJa....
export AWS_DEFAULT_REGION=ap-northeast-2

Windows
set AWS_ACCESS_KEY_ID=AKIA.....
set AWS_SECRET_ACCESS_KEY=wJa....
set AWS_DEFAULT_REGION=ap-northeast-2
## Powershell
$Env:AWS_ACCESS_KEY_ID="AKIA....."
$Env:AWS_SECRET_ACCESS_KEY="wJa...."
$Env:AWS_DEFAULT_REGION="ap-northeast-2"

# 페이저 사용 비활성화
export AWS_PAGER=""
set AWS_PAGER=""
4. 실습에 편리한 툴 들 설치 : watch, jq, tree 등
# macOS
brew install tree jq watch

# windows
~
5. AWS 서울 리전(ap-northeast-2)에 default VPC 존재 확인 : 없을 경우 default VPC 생성 해두기 : 실습 초반은 default VPC
에서 실습 진행됨 - 링크
aws ec2 describe-vpcs --filter 'Name=isDefault,Values=true' | jq
{
...

aws ec2 describe-vpcs --filter 'Name=isDefault,Values=true' | jq '.Vpcs[0].VpcId'
"vpc-3912a952"


#aws ec2 describe-subnets --filter 'Name=vpc-id,Values=vpc-3912a952' --output table
aws ec2 describe-subnets --filter 'Name=vpc-id,Values=vpc-<자신의VPC ID>' --output table- default VPC가 삭제되어 없을 경우, 아래 처럼 default VPC를 생성 - 링크
# default VPC를 생성
aws ec2 create-default-vpc

# default Subnet 생성
aws ec2 create-default-subnet --availability-zone ap-northeast-2a
aws ec2 create-default-subnet --availability-zone ap-northeast-2b
aws ec2 create-default-subnet --availability-zone ap-northeast-2c
aws ec2 create-default-subnet --availability-zone ap-northeast-2d
[실습1] 테라폼 설치
macOS : 테라폼 버전 v1.3.2 - 링크

# 설치
brew install tfenv

#
tfenv list-remote
tfenv install 1.4.6
tfenv use 1.4.6
tfenv list
terraform version

# 자동완성
terraform -install-autocomplete
## 참고 .zshrc 에 아래 추가됨
cat ~/.zshrc
autoload -U +X bashcompinit && bashcompinit
complete -o nospace -C /usr/local/bin/terraform terraform- Windows : 윈도우에 설치
# 설치 v1.3.2
C:\> mkdir terraform
C:\> cd terraform
C:\terraform> curl -O https://releases.hashicorp.com/terraform/1.3.2/terraform_1.3.2_windows_amd64.zip
C:\terraform> tar -xf terraform_1.3.2_windows_amd64.zip
C:\terraform> terraform version
Terraform v1.3.2

# Windows는 Shell Tab-completion을 지원하지 않음 (bash 또는 zsh만 지원)
https://www.terraform.io/cli/commands#shell-tab-completion

# Terrafom 전체 버전 저장소
https://releases.hashicorp.com/terraform

# 윈도우 11에서 PATH 환경 변수 등록 (terraform 설치한 디렉토리 PATH 등록)
https://11q.kr/www/bbs/board.php?bo_table=s21&wr_id=4840&page=5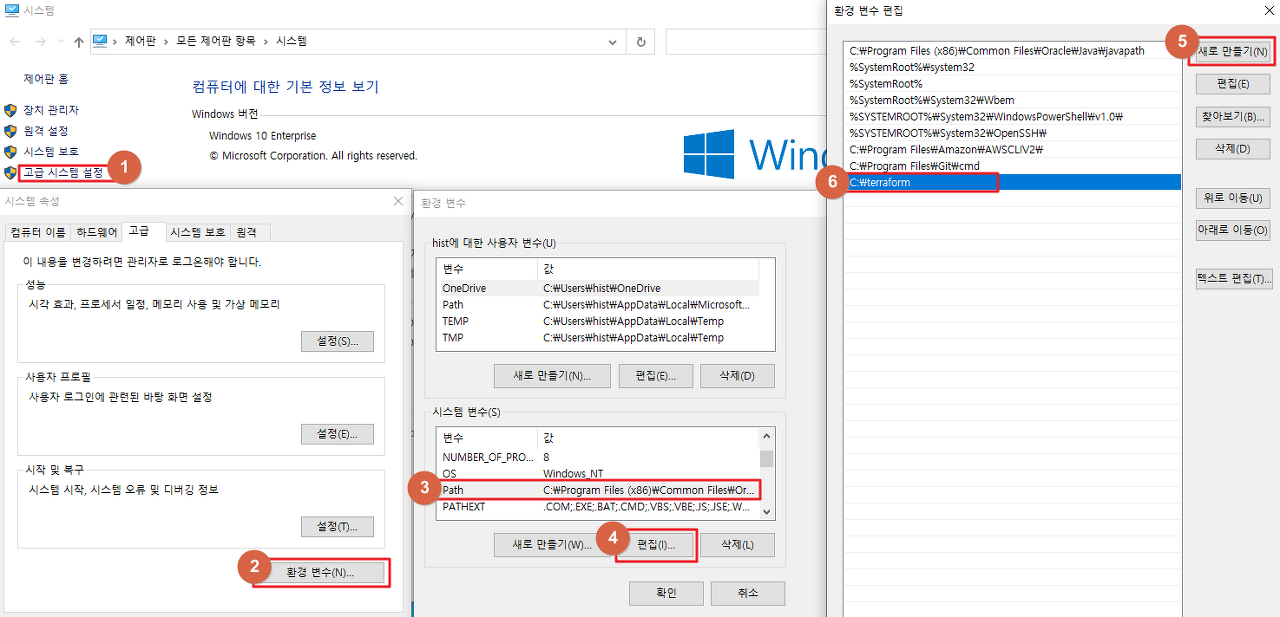
[실습2] default VPC에 EC2 1대 배포
2-1. 배포 전 준비
- AWS 자신의 계정 자격증명
# 환경 변수로 자격증명 설정
Linux or macOS
export AWS_ACCESS_KEY_ID=AKIA....
export AWS_SECRET_ACCESS_KEY=wJal....
export AWS_DEFAULT_REGION=ap-northeast-2- 작업 디렉터리 생성 및 이동
# 각자 편한 디렉터리를 생성해주시면 됩니다
mkdir Study-Terraform
cd Study-Terraform- Amazon Linux 최신 ami id 찾기 : ami-0c76973fbe0ee100c → 자주 업데이트가 되긴함
#aws ec2 describe-images --owners self amazon
aws ec2 describe-images --owners self amazon --query 'Images[*].[ImageId]' --output text

aws ssm get-parameters-by-path --path /aws/service/ami-amazon-linux-latest
aws ssm get-parameters-by-path --path /aws/service/ami-amazon-linux-latest --query "Parameters[].Name"
#aws ssm get-parameters-by-path --path /aws/service/ami-amazon-linux-latest --query "Parameters[].Value"- EC2 생성 모니터링
# [터미널1] EC2 생성 모니터링
# macOS
export AWS_PAGER=""
while true; do aws ec2 describe-instances --query "Reservations[*].Instances[*].{PublicIPAdd:PublicIpAddress,InstanceName:Tags[?Key=='Name']|[0].Value,Status:State.Name}" --filters Name=instance-state-name,Values=running --output text ; echo "------------------------------" ; sleep 1; done

# 윈도우
#FOR /L %N IN () DO @echo Oops
set AWS_PAGER=""
while (1) {aws ec2 describe-instances --query "Reservations[*].Instances[*].{PublicIPAdd:PublicIpAddress,InstanceName:Tags[?Key=='Name']|[0].Value,Status:State.Name}" --filters Name=instance-state-name,Values=running --output text ; echo "------------------------------"; sleep 1}
2-2. EC2 1대 배포 실행 : HCLHashicorp Configuration Language 코드 파일 생성
- 코드 파일 작성 : provider : Terraform으로 정의할 Infrastructure Provider를 의미 - Docs , resource : 실제로 생성할
인프라 자원을 의미
Terraform Registry
registry.terraform.io
cat <<EOT > main.tf
provider "aws" {
  region = "ap-northeast-2"
}

resource "aws_instance" "example" {
  ami           = "ami-0c76973fbe0ee100c"
  instance_type = "t2.micro"
}
EOT
테라폼 시리즈 5편. 테라폼 언어 구조
참고자료: https://www.terraform.io/language#about-the-terraform-language 테라폼 언어는 BLOCK단위로 구성됩니다. "" "" { # Block body = # Argument } 아래 예제는 provider이라는 BLOCK타입을 사용하여 provider를 설정합니다.
malwareanalysis.tistory.com
- 윈도우 사용 시 : PowerShell 에서 아래 내용 복사&붙여넣기 할 것
@'
provider "aws" {
  region = "ap-northeast-2"
}

resource "aws_instance" "example" {
  ami           = "ami-0c76973fbe0ee100c"
  instance_type = "t2.micro"

  tags = {
    Name = "t101-study"
  }

}
'@ > main.tf
resource “<PROVIDER>_<TYPE>” “<NAME>” {
[CONFIG ...]
}
PROVIDER : ‘aws’ 같은 공급자의 이름
TYPE : ‘security_group’ 같은 리소스의 유형
NAME : 리소스의 이름
CONFIG : 한개 이상 arguments- 배포 실행 : 터미널2에서 실행
# 초기화
terraform init
ls -al
tree .terraform
.terraform
└── providers
    └── registry.terraform.io
        └── hashicorp
            └── aws
                └── 4.67.0
                    └── darwin_arm64
                        └── terraform-provider-aws_v4.67.0_x5

# plan 확인
terraform plan

# apply 실행
terraform apply
 Enter a value: yes 입력

....
aws_instance.example: Creating...
aws_instance.example: Still creating... [10s elapsed]
aws_instance.example: Still creating... [20s elapsed]
aws_instance.example: Still creating... [30s elapsed]
aws_instance.example: Creation complete after 32s [id=i-0929d0c3abeda6fc5]

Apply complete! Resources: 1 added, 0 changed, 0 destroyed.

# ec2 생성 확인 : aws 웹 관리 콘솔에서도 확인
export AWS_PAGER=""
aws ec2 describe-instances --output table
2-3. EC2 태크 정보 수정
- 코드 파일 수정
cat <<EOT > main.tf
provider "aws" {
  region = "ap-northeast-2"
}

resource "aws_instance" "example" {
  ami           = "ami-0c76973fbe0ee100c"
  instance_type = "t2.micro"

  tags = {
    Name = "t101-study"
  }

}
EOT- 배포 실행
# plan 실행 시 아래와 같은 정보가 출력
terraform plan
....
# aws_instance.example will be updated in-place
  ~ resource "aws_instance" "example" {
        id                                   = "i-0929d0c3abeda6fc5"
      ~ tags                                 = {
          + "Name" = "t101-study"
        }
      ~ tags_all                             = {
          + "Name" = "t101-study"
        }
        # (30 unchanged attributes hidden)

        # (8 unchanged blocks hidden)
    }

Plan: 0 to add, 1 to change, 0 to destroy.
....

# apply 실행
terraform apply
 Enter a value: yes 입력

# 모니터링 : [터미널1]에 Name 확인
2-4. EC2 삭제
# 리소스 삭제
terraform destroy
 Enter a value: yes 입력

혹은
terraform destroy -auto-approve
2-5. (심화) AMI 최신 이미지 가져오기 - 링크
# 방안1
추후 ec2 생성시 ssm에 있는 ami을 가져오기
data "aws_ssm_parameter" "amzn2_latest" {
  name = "/aws/service/ami-amazon-linux-latest/amzn2-ami-kernel-5.10-hvm-x86_64-gp2"
}

# 방안2
data "aws_ami" "linux" {
  owners      = ["amazon"]
  most_recent = true

  filter {
    name   = "name"
    values = ["amzn2-ami-hvm*"]
  }
}
resource "aws_instance" "aaaaaaaa" {
  ami                    = data.aws_ami.amazonlinux2.id

//...

  lifecycle {
    ignore_changes = [ami]
  }
}

# 방안3
data "aws_ami" "ubuntu" {
    most_recent = true

    filter {
        name   = "name"
        values = ["ubuntu/images/hvm-ssd/ubuntu-*-*-amd64-server-*"]
    }

    filter {
        name   = "virtualization-type"
        values = ["hvm"]
    }

    owners = ["099720109477"] # Canonical
}
[실습3] default VPC에 웹 서버 배포
목표 : EC2 1대를 배포하면서 userdata 에 웹 서버 설정 → 간단한 애플리케이션 설정 자동화
3-1. 배포 : Ubuntu 22.04 LTS 사용 (ami-0e9bfdb247cc8de84)
- 코드 파일 작성 : user_data 에 실행 명령어 작성
cat <<EOT > main.tf
provider "aws" {
  region = "ap-northeast-2"
}

resource "aws_instance" "example" {
  ami                    = "ami-0e9bfdb247cc8de84"
  instance_type          = "t2.micro"

  user_data = <<-EOF
              #!/bin/bash
              echo "Hello, T101 Study" > index.html
              nohup busybox httpd -f -p 8080 &
              EOF

  tags = {
    Name = "terraform-Study-101"
  }
}
EOT- 배포 실행
# plan
terraform plan
+ user_data                            = "d91ca31904077f0b641b5dd5a783401396ffbf3f"

# apply 실행
terraform apply -auto-approve- 웹서버 접속 시도 : 터미널3에서 실행
# [터미널3] 변수 지정
PIP=<각자 자신의 EC2 IP>
PIP=3.35.16.102
while true; do curl --connect-timeout 1 http://$PIP:8080/ ; echo "------------------------------"; date; sleep 1; done
웹 서버 접속이 왜 되지 않을까요?
3-2. 문제 해결 : 웹서버 접속
- 코드 파일 수정 : 보안 그룹 생성 후 연동
cat <<EOT > main.tf
provider "aws" {
  region = "ap-northeast-2"
}

resource "aws_instance" "example" {
  ami                    = "ami-0e9bfdb247cc8de84"
  instance_type          = "t2.micro"
  vpc_security_group_ids = [aws_security_group.instance.id]

  user_data = <<-EOF
              #!/bin/bash
              echo "Hello, T101 Study" > index.html
              nohup busybox httpd -f -p 8080 &
              EOF

  tags = {
    Name = "Single-WebSrv"
  }
}

resource "aws_security_group" "instance" {
  name = var.security_group_name

  ingress {
    from_port   = 8080
    to_port     = 8080
    protocol    = "tcp"
    cidr_blocks = ["0.0.0.0/0"]
  }
}

variable "security_group_name" {
  description = "The name of the security group"
  type        = string
  default     = "terraform-example-instance"
}

output "public_ip" {
  value       = aws_instance.example.public_ip
  description = "The public IP of the Instance"
}
EOT- 배포 실행
# plan/apply
terraform plan
terraform apply -auto-approve
#terraform graph

# 모니터링 : EC2 정보와 curl 접속 확인
while true; do curl --connect-timeout 1 http://$PIP:8080/ ; echo "------------------------------"; date; sleep 1; done
------------------------------
2023년 5월 23일 화요일 12시 57분 40초 KST
Hello, T101 Study
------------------------------- 참조 reference 는 코드의 다른 부분에서 값에 액세스 할 수 있게 해주는 표현식
<PROVIDER>_<TYPE>.<NAME>.<ATTRIBUTE>
-
- PROVIDER : ‘aws’ 같은 공급자의 이름
- TYPE : ‘security_group’ 같은 리소스의 유형
- NAME : 보안 그룹 이름인 ‘instance’ 같은 리소스의 이름
- ATTRIBUTE : ‘name’ 과 같은 리소스의 인수 중 하나이거나 리소스가 내보낸 속성 중 하나
- 보안 그룹은 id라는 주석을 내보내므로 이를 참조하는 표현식은 아래와 같음
aws_security_group.instance.id
-
- 하나의 리소스에서 다른 리소스로 참조를 추가하면 내재된 종속성이 작성됨
- 테라폼은 종속성 구문을 분석하여 종속성 그래프를 작성하고, 이를 사용하여 리소스를 생성하는 순서를 자동으로 결정함
3-3. 웹 서비스 포트 변경
- 코드 파일 수정 : userdata 값을 변경 시에는 ec2 replace
cat <<EOT > main.tf
provider "aws" {
  region = "ap-northeast-2"
}

resource "aws_instance" "example" {
  ami                    = "ami-0e9bfdb247cc8de84"
  instance_type          = "t2.micro"
  vpc_security_group_ids = [aws_security_group.instance.id]

  user_data = <<-EOF
              #!/bin/bash
              echo "Hello, T101 Study 9090" > index.html
              nohup busybox httpd -f -p 9090 &
              EOF

  user_data_replace_on_change = true

  tags = {
    Name = "Single-WebSrv"
  }
}

resource "aws_security_group" "instance" {
  name = var.security_group_name

  ingress {
    from_port   = 9090
    to_port     = 9090
    protocol    = "tcp"
    cidr_blocks = ["0.0.0.0/0"]
  }
}

variable "security_group_name" {
  description = "The name of the security group"
  type        = string
  default     = "terraform-example-instance"
}

output "public_ip" {
  value       = aws_instance.example.public_ip
  description = "The public IP of the Instance"
}
EOT- 배포 실행
# plan
terraform plan
# aws_instance.example must be replaced
-/+ resource "aws_instance" "example" {
...
      ~ user_data                            = "d91ca31904077f0b641b5dd5a783401396ffbf3f" -> "f1a1c16060740d7be18475c067c120a0eed366da"
        # forces replacement
...
Changes to Outputs:
  ~ public_ip = "43.201.8.225" -> (known after apply)

# apply
terraform apply -auto-approve

# 웹 서버 접속 시도 : 터미널3에서 실행
# process 올라오는데 시간이 1~2분 정도 소요되어서, ec2 생성되면 1~2분 정도 후에 curl 접속이 가능하다
PIP=<각자 자신의 EC2 IP>
PIP=43.200.170.41

while true; do curl --connect-timeout 1  http://$PIP:9090/ ; echo "------------------------------"; date; sleep 1; done
------------------------------
2023년 5월 23일 화요일 13시 08분 47초 KST
Hello, T101 Study 9090
------------------------------- 삭제
terraform destroy -auto-approve테라폼 시리즈 8편. 변경/변경불가능 속성
안녕하세요. 이 글은 테라폼스터디 1주차 내용을 정리했습니다. 1. 변경/변경불가능 속성이란? 테라폼 코드를 인프라에 반영 한 후, 일부 속성을 변경하고 다시 인프라에 반영하면 어떻게 될까요
malwareanalysis.tistory.com
인프라 배포 후 애플리케이션 설정 할 수 있는 다양한 방법이 있고 장단점이 있습니다. 좀 더 견고하고 안정적이며 신뢰할 수 있는 방법이 무엇일까요? - 참고링크 링크 - 테라폼 코드 userdata 사용, cloud-init 사용, Packer 활용, Provisiner Connections 활용, 별도의 설정 관리 툴 사용(Chef, Habitat, Puppet 등)
[과제1] EC2 웹 서버 배포
목표 : Ubuntu 에 apache(httpd) 를 설치하고 index.html 생성(닉네임 출력 포함)하는 userdata 를 짜서 설정 배포 후
curl 접속 해보고, 해당 테라폼 코드(파일)를 올려주세요
- 코드파일 생성
provider "aws" {
  region = "ap-northeast-2"
}

resource "aws_instance" "example" {
  ami                    = "ami-0e9bfdb247cc8de84"
  instance_type          = "t2.micro"
  vpc_security_group_ids = [aws_security_group.instance.id]

  user_data = <<-EOF
  #!/bin/bash
  sudo apt update -y
  sudo apt install apache2 -y
  sudo echo "PJH WebSrv" > /var/www/html/index.html
  EOF

  tags = {
    Name = "PJH-WebSrv"
  }
}

resource "aws_security_group" "instance" {
  name = var.security_group_name

  ingress {
    from_port   = 80
    to_port     = 80
    protocol    = "tcp"
    cidr_blocks = ["0.0.0.0/0"]
  }

  egress {
    from_port   = 0
    to_port     = 0
    protocol    = "-1"
    cidr_blocks = ["0.0.0.0/0"]
  }
}

variable "security_group_name" {
  description = "The name of the security group"
  type        = string
  default     = "terraform-my-instance"
}

output "public_ip" {
  value       = aws_instance.example.public_ip
  description = "The public IP of the Instance"
}- 배포 실행 및 확인
# 배포 및 확인
terraform plan
terraform apply -auto-approve

# 웹 서버 접속 시도 : 터미널2에서 실행
# process 올라오는데 시간이 1~2분 정도 소요되어서, ec2 생성되면 1~2분 정도 후에 curl 접속이 가능하다
PIP=<각자 자신의 EC2 IP>
PIP=52.79.233.190
while true; do curl --connect-timeout 1  http://$PIP:/ ; echo "------------------------------"; date; sleep 1; done
------------------------------
2023년 5월 23일 화요일 16시 08분 23초 KST
PJH Terrafrom Study
------------------------------

# 삭제
terraform destroy -auto-approve
[심화 옵션] 코드와 실제 배포된 형상이 일치하지 않을 때
테라폼 형상 : Local코드, AWS실제인프라, Backend에 저장된 상태(가장 최근에 배포한 테라폼 코드 형상) - 링크
- 실습
# 신규 폴더 생성 후 이동
mkdir sync-state
cd sync-state

# 코드 파일 생성
cat <<EOF > provider.tf
provider "aws" {
  region = "ap-northeast-2"
}
EOF

# 초기화
terraform init

# 코드 파일 생성 : S3
NICK=pjh
cat <<EOF > main.tf
resource "aws_s3_bucket" "t101study" {
    bucket = "$NICK-t101study-bucket"
}
EOF

cat main.tf
resource "aws_s3_bucket" "t101study" {
    bucket = "pjh-t101study-bucket"
}

# plan
terraform plan

# apply
terraform apply

# [터미널2] 모니터링
while true; do aws s3 ls ; echo "------------------------------"; date; sleep 1; done
------------------------------
2023년 5월 23일 화요일 13시 20분 47초 KST
2023-02-01 12:34:01 pjh-k8s-s3
2023-05-23 13:20:43 pjh-t101study-bucket
------------------------------

# 작업 결과가 backend(저희는 별도 지정이 없으니 localPC)에 .tfstate 파일에 저장
ls -al
cat terraform.tfstate | jq
terraform plan- 배포된 상태에서 강제로 코드(.tf) 파일을 삭제 시
# plan 아래에 출력 내용은 왜? 이유가?
rm -rf main.tf
terraform plan
...
# aws_s3_bucket.t101study will be destroyed
...

# apply 적용 시 어떻게 될 까요?
terraform apply -auto-approve
cat terraform.tfstate | jq

# 확인
while true; do aws s3 ls ; echo "------------------------------"; date; sleep 1; done

------------------------------
2023년 5월 23일 화요일 13시 22분 52초 KST
2023-02-01 12:34:01 pjh-k8s-s3
------------------------------- 다시 신규 S3 생성
# 코드 파일 수정
NICK=pjh

cat <<EOF > main.tf
resource "aws_s3_bucket" "t101study" {
    bucket = "$NICK-t101study-bucket-2"
}
EOF

cat main.tf
resource "aws_s3_bucket" "t101study" {
    bucket = "pjh-t101study-bucket-2"
}

# plan/apply
terraform plan
terraform apply -auto-approve
cat terraform.tfstate | jq- 이번에는 강제로 상태(.tfstate) 파일을 삭제 시
# plan 아래에 출력 내용은 왜? 이유가? plan 이 현재 최종 상태를 점검하는지?
rm -rf terraform.tfstate
terraform plan

# apply 적용 시 어떻게 될 까요?
terraform apply -auto-approve
╷
│ Error: creating Amazon S3 (Simple Storage) Bucket (pjh-t101study-bucket-2): BucketAlreadyOwnedByYou: Your previous request to create the named bucket succeeded and you already own it.
│ 	status code: 409, request id: ZX1DGAEDW2AQ5F22, host id: FassgJ0ga7CPFwCXOCjltZeAJs6p73pGT+Yk79hcf9oq53MsFntndDFx0G2R5LuuW7PcJ/I7Mtc=
│
│   with aws_s3_bucket.t101study,
│   on main.tf line 1, in resource "aws_s3_bucket" "t101study":
│    1: resource "aws_s3_bucket" "t101study" {
│
╵

# 상태 파일에 내용은 어떻게 되어 있나요?
cat terraform.tfstate | jq

# import
terraform import aws_s3_bucket.t101study $NICK-t101study-bucket-2
cat terraform.tfstate | jq

# apply 시 어떻게 될까요?
terraform apply -auto-approve- 삭제 : terraform destroy -auto-approve
IaC 도입 시에는 최대한 코드를 통한 상태가 실제 배포된 프로바이더의 상태가 되도록 맞추는 것이 중요!!
(심화) 동기화 및 상태 관리 - 링크
# 멤버1
운영환경에서는 terraform import는 100% 신뢰하지 마세요.
복잡한 인프라 구성에서는 import를 하고 plan 과 apply를 하면 리소스를 destroy 하거나 in-place를 하는 경우가 가끔 있습니다.
그래서 local에 저장하지 않고 S3 같은 오브젝트 스토리지에 오브젝트들에 대해서 버저닝 기능을 활성화해서 사용하시는 것이 권장 입니다.

# 멤버2
s3/dynamodb는 가끔 state가 날아가는 불상사가 있을수 있으니 plan b는 꼭 마련해두세요

# 멤버3
저는 2021년부터 s3 backend로 쓰고 있긴한데, 아직 사고는 없었구요. 운영환경에서 걱정된다면 s3 버전관리를 켜놓으면 좀 안심 될 것 같네요
terraform {
  required_providers {
    aws = {
      source  = "hashicorp/aws"
      version = "4.10.0" # 2022-04-15
    }
  }
  backend "s3" {
    bucket = "버킷이름"
    key    = "terraform-backend/저장될파일명"
    region = "ap-northeast-2"
  }
}
테라폼 시리즈 7편. 테라폼 상태파일(tfstate)
안녕하세요. 이 글은 테라폼스터디 1주차 내용을 정리했습니다. 1. 상태파일이란? 테라폼은 코드를 인프라로 반영하면, 반영 상태를 파일로 관리합니다. 파일 확장자는 tfstate입니다. 상태파일은
malwareanalysis.tistory.com
[이론] Variable 변수
1. DRY Don’t Repeat Yourself : 코드 반복 제거 → 예) 입력 변수 정의 후 구성 관리 ⇒ 변수 선언
variable “NAME” {
  [CONFIG …]
}- 변수 선언의 본문에는 3개의 매개 변수가 포함될 수 있으며, 모두 선택적 매개 변수임
- description : 설명, 코드 내용 및 plan/apply 명령어를 실행할 때 설명 볼 수 있음
- default : 변수 값을 전달하는 여러 가지 방법을 지정하지 않으면 기본값이 전달됨, 기본값이 없으면 대화식으로 사용자에게 변수에 대한 정보를 물어봄
- 변수 값 전달 : 명령 줄(-var 옵션), 파일(-var-file 옵션), 환경 변수(테라폼은 이름이 ‘TF_VAR_<variable_name>’)
- type : 전달하려는 변수의 유형 지정, string number bool list map set object tuple 와 유형을 지정하지 않으면 any 유형으로 간주
- sensitive : 입력 변수가 사용 시 출력 제한(암호 등 민감 데이터의 경우) - 링크
- validation : 변수 값에 사용자 지정 검사 설정 - 링크
- 전달할 값이 number 인지 확인하는 입력 변수의 예
variable "number_example" {
  description = "An example of a number variable in Terraform"
  type        = number
  default     = 42
}- 전달할 값이 list 인지 확인하는 입력 변수의 예
variable "list_example" {
  description = "An example of a list in Terraform"
  type        = list
  default     = ["a", "b", "c"]
}- 제약 조건 결합 사용 가능. 다음은 리스트의 모든 항목이 number 인 list 의 예
variable "list_numeric_example" {
  description = "An example of a numeric list in Terraform"
  type        = list(number)
  default     = [1, 2, 3]
}- 다음은 모든 값이 string 인 map 의 예
variable "map_example" {
  description = "An example of a map in Terraform"
  type        = map(string)

  default = {
    key1 = "value1"
    key2 = "value2"
    key3 = "value3"
  }
}- 다음은 object 또는 tuple 제약 조건을 사용하여 보다 복잡한 구조적 유형(structural type) 작성 가능
variable "object_example" {
  description = "An example of a structural type in Terraform"
  type        = object({
    name    = string
    age     = number
    tags    = list(string)
    enabled = bool
  })

  default = {
    name    = "value1"
    age     = 42
    tags    = ["a", "b", "c"]
    enabled = true
  }
}
3. 입력 변수 실행 : variables.tf 파일 생성 후 plan
- 코드 파일 작성
cat <<EOT > variables.tf
variable "object_example_with_error" {
  description = "An example of a structural type in Terraform with an error"
  type        = object({
    name    = string
    age     = number
    tags    = list(string)
    enabled = bool
  })

  default = {
    name    = "value1"
    age     = 42
    tags    = ["a", "b", "c"]
    enabled = "invalid"
  }
}
EOT- plan 실행 : 오류 출력 확인, 일부러 유형이 일치하지 않는 값을 설정 시 테라폼은 유형 오류 출력
# main.tf 내용 초기화
echo > main.tf

# plan
terraform plan

│ Error: Invalid default value for variable
│
│   on variables.tf line 10, in variable "object_example_with_error":
│   10:   default = {
│   11:     name    = "value1"
│   12:     age     = 42
│   13:     tags    = ["a", "b", "c"]
│   14:     enabled = "invalid"
│   15:   }
│
│ This default value is not compatible with the variable's type constraint: a bool is required.
[실습4] 입력 변수
목표 : 웹 서버의 포트 넘버를 입력 받아서 처리해보기
4-1. 실습 : 4가지 입력 방안
- 코드 파일 작성
cat <<EOT > variables.tf
variable "server_port" {
  description = "The port the server will use for HTTP requests"
  type        = number
}
EOT- plan : (방안1) 대화형으로 변수값 입력
terraform plan
var.server_port
  The port the server will use for HTTP requests

  Enter a value: 8080

No changes. Your infrastructure matches the configuration.
Terraform has compared your real infrastructure against your configuration and found no differences, so no changes are needed.- plan : (방안2) -var 옵션
terraform plan -var "server_port=8080"- plan : (방안3) 환경변수
# 환경변수에 지정
export TF_VAR_server_port=8080
terraform plan

# 환경변수 확인
export | grep TF_VAR_

# 환경변수 지정 삭제
unset TF_VAR_server_port- plan : (방안4) 디폴트값을 미리 지정
cat <<EOT > variables.tf
variable "server_port" {
  description = "The port the server will use for HTTP requests"
  type        = number
  default     = 8080
}
EOT

# plan
terraform plan
4-2. 웹서버 포트 입력 방안 : userdata(interpolication)와 보안그룹에 입력값이 적용
- 입력 변수 값 사용하려면, 변수 참조(variable reference)라는 새로운 유형의 표현식을 사용할 수 있음
var.<VARIABLE_NAME>- 예를 들어 보안 그룹의 from_port 및 to_port 매개 변수를 server_port 변수의 값으로 설정하는 방법은 아래와 같음
resource "aws_security_group" "instance" {
  name = "terraform-example-instance"

  ingress {
    from_port   = var.server_port
    to_port     = var.server_port
    protocol    = "tcp"
    cidr_blocks = ["0.0.0.0/0"]
  }
}- 또한 사용자 데이터 스크립트에서 포트를 설정할 때도 동일한 변수를 사용하는것이 좋습니다.
- 문자열 리터럴 내에서 참조를 사용하려면 보간(interpolation)이라는 새로운 유형의 표현식을 사용해야 합니다.
“${…}”- 중괄호 안에 참조를 넣을 수 있으며 테라폼은 이를 문자열로 반환
- 예를 들어 사용자 데이터 문자열 내에서 var.server_port를 사용하는 방법은 다음과 같음
user_data = <<-EOF
            #!/bin/bash
            echo "Hello, World" > index.html
            nohup busybox httpd -f -p ${var.server_port} &
            EOF
[실습5] 웹 서버 포트 지정 배포
5-1 실습
- 코드 파일 작성 : CMD창에서 바로 복사&붙여넣기로 main.tf 파일 생성 시 \ 주의 ⇒ 그냥 직접 IDE에 붙여넣을때는 \ 제거하세요
cat <<EOT > variables.tf
variable "server_port" {
  description = "The port the server will use for HTTP requests"
  type        = number
  default     = 8080
}
EOT
cat <<EOT > main.tf
provider "aws" {
region = "ap-northeast-2"
}
resource "aws_instance" "example" {
ami = "ami-0e9bfdb247cc8de84"
instance_type = "t2.micro"
vpc_security_group_ids = [aws_security_group.instance.id]
user_data = <<-EOF
#!/bin/bash
echo "My Web Server - var test" > index.html
nohup busybox httpd -f -p \${var.server_port} &
EOF
user_data_replace_on_change = true
tags = {
Name = "Single-MyWebSrv"
}
}
resource "aws_security_group" "instance" {
name = var.security_group_name
ingress {
from_port = var.server_port
to_port = var.server_port
protocol = "tcp"
cidr_blocks = ["0.0.0.0/0"]
}
}
variable "security_group_name" {
description = "The name of the security group"
type = string
default = "terraform-my-instance"
}
output "public_ip" {
value = aws_instance.example.public_ip
description = "The public IP of the Instance"
}
EOT- plan, apply 배포 실행 : main.tf 파일과 variables.tf
# plan/apply
#rm -rf provider.tf
terraform plan
terraform apply -auto-approve

# 리소스 상태 확인
terraform state list
aws_instance.example
aws_security_group.instance

terraform state show aws_instance.example
terraform state show aws_security_group.instance

# 모니터링 : EC2 정보와 curl 접속 확인
# [터미널3] 변수 PIP로 변경
PIP=<각자 자신의 EC2 IP>
PIP=13.125.108.235
PPT=8080
while true; do curl --connect-timeout 1  http://$PIP:$PPT/ ; echo "------------------------------"; date; sleep 1; done
------------------------------
2023년 5월 23일 화요일 14시 49분 14초 KST
My Web Server - var test
------------------------------

# 삭제
terraform destroy -auto-approve
5-2 출력 변수 - 링크
output “<NAME>” {
  value = <VALUE>
 [CONFIG …]
}- NAME은 출력 변수의 이름이며, VALUE 는 출력하려는 테라폼 표현식일 수 있습니다.
- CONFIG는 아래의 선택적 매개 변수를 추가로 포함할 수 있습니다.
- describtion : 설명, 출력 변수에 어떤 유형의 데이터가 포함되어 있는지를 설명
- sensitive : plan/apply 실행 시 암호등 민감정보 내용은 출력하지 않게 하기 위해서 sensitive=true 하면됨
- depends_on : 테라폼이 알아서 해주시면, 특별한 경우 depends_on 으로 처리 순서를 보장 할 수 있음
output "public_ip" {
  value       = aws_instance.example.public_ip
  description = "The public IP address of the web server"
}- 배포 시 출력내용 확인
#
...
Apply complete! Resources: 2 added, 0 changed, 0 destroyed.

Outputs:

public_ip = "43.201.71.161"

# 직접 확인
terraform output
public_ip = "43.201.71.161"

terraform output public_ip
"43.201.71.161"

# 실습 환경 삭제
terraform destroy -auto-approve'Terraform' 카테고리의 다른 글
| 3주차 - 기본 사용 3/3 & 프로바이더 (0) | 2023.07.21 |
|---|---|
| 2주차 - 테라폼 기본 사용 2/3 (0) | 2023.07.12 |
| 1주차 - 테라폼 기본 사용 1/2 (0) | 2023.07.05 |
| [CHAPTER 2] ASG/ELB (0) | 2023.06.01 |


